Support
-
MannMade USA 2010 Tremolo Bridge for Fender 6-Screw Guitars
MannMade USA 2010 VintageVibrato™ Bridge Mounting Instructions
Retrofit Installation: for direct installation on Fender® - Style Guitars :
- It is suggested all work be preformed on a clean, padded, non-marring work surface.
- Remove strings, bridge and associated hardware.
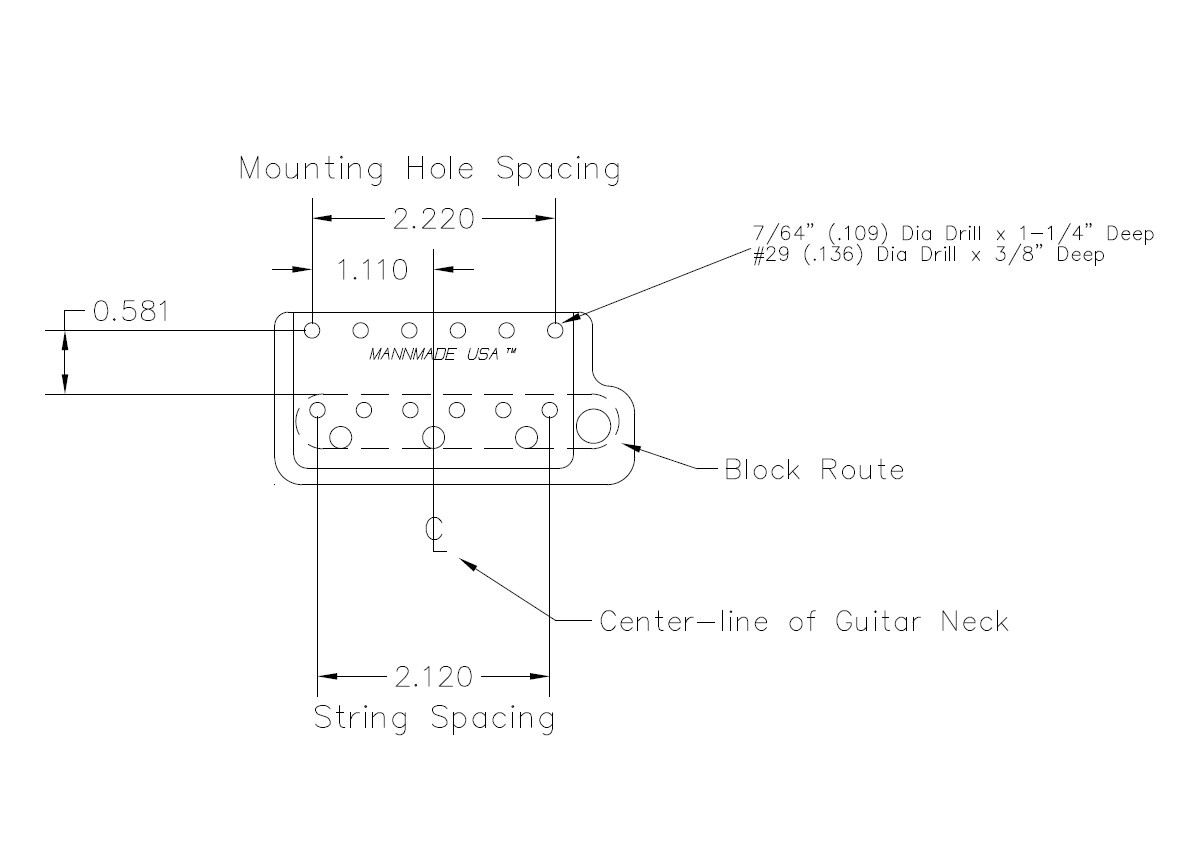
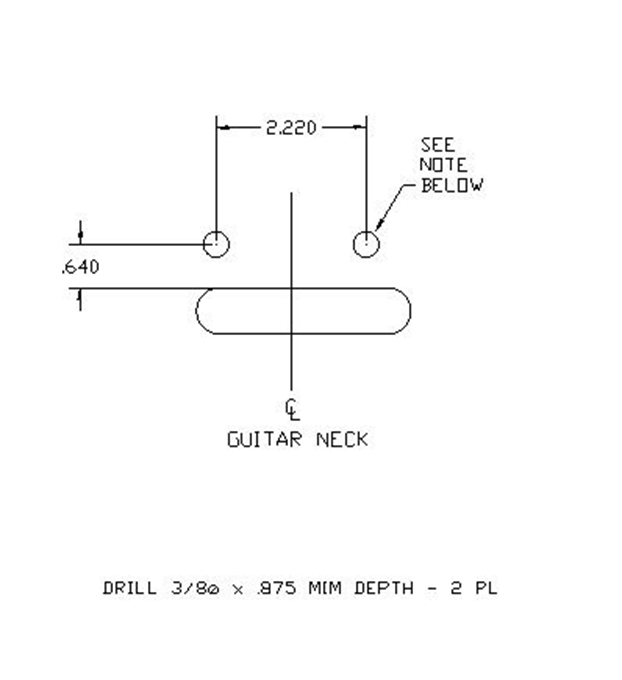
- Check mounting hole sizes to verify they match holes sizes & depths per template instructions below. This is very important! If the sizes are not correct, you will damage or break mounting screws during installation.
- Place your new bridge into the guitar cavity, resting the bridge flat on the guitar top.
- Using a #2 Phillips head screwdriver, install the six (6) mounting screws so that the underside of the screw head is approximately 3/16” above the saddle surface of the bridge.
- Using the flat surfaces of the 2.5mm hex wrench (included) as feeler gage, adjust the six (6) mounting screws so that the hex wrench just fits between the underside of the screw head and the saddle surface. Double check this step so that all screws are adjusted exactly the same height. An incorrect adjustment could easily ruin your new bridge!
- This process should position the bridge with the suggested float of 1/16” above guitar body
- Place the face of guitar on a clean, padded, non-marring work surface.
- Install new claw (if necessary).
- Using a flat punch & hammer, gently tap in the return springs, so that they are firmly seated in the bridge block. Take precaution to support both the bridge & guitar before proceeding!
- Hook the other end of the springs into the claw.
- String up guitar, tune to pitch and test for smoothness and accuracy of return to “zero position”.
- Adjust claw in/out to obtain proper tension of bridge.
- Repeat any of the above steps as necessary.
- Adjust saddles for proper intonation & string height.
- DO NOT adjust the mounting screws with strings at full tension!!! Detune guitar!!
Click here for Installation Tutorial Video
For Installation by Skilled & Authorized Technicians Only!
MannMade USA not responsible for damage caused by incorrect installationNew Installation: For custom or un-routed guitars :
- Route cavity to standard Fender Strat® vibrato cavity
- Refer to template instructions below.
- Install bridge per “Retrofit Instructions” above.
-
MannMade USA 2020 Tremolo Bridge for Fender 2-Post Strat Style Guitars
MannMade USA 2020 Classic Vibrato Bridge Mounting Instructions
Retrofit Installation: for direct installation on Strat - style Guitars
- Remove strings, bridge and associated hardware.
- Check mounting hole sizes to verify they match holes sizes per template instructions below.
- Install new MannMade USA 2020 Classic Vibrato Bridge using hardware included.
- Start with the two (2) mounting posts into the existing threaded inserts to obtain desired
bridge height. (Suggested float is 1/16" above guitar body). - Inspect and double check t o verify that both posts are adjusted so that the shaft v-grooves are
exactly the same height. A n incorrect adjustment could easily ruin your new bridge! - Install new claw (if necessary) and the return springs, adjust t o desired tension.
- String up guitar, tune to pitch and test for smoothness and accuracy o f return to "zero
- Repeat any of the above steps as necessary. DO NOT adjust the mounting screws with strings
at full tension!!! Detune guitar!!!
Click here for Installation tutorial Video
For Installation by Skilled & Authorized Technicians Only!
MannMade USA not responsible for damage caused by incorrect installationNew Installation: For custom or un-routed guitars.
- Route cavity to standard Fender Strat vibrato cavity
- Refer to template instructions below.
- Install bridge per "Retrofit Instructions" above.
"Fender" and "Strat" are registered trademarks of Fender® and are not affiliated with MannMade USA.
-
MannMade USA 2030 Tremolo Bridge for Fender Modern Guitars
MannMade USA 2030 ModernVibrato™ Bridge Mounting Instructions
Retrofit Installation: for direct installation on Fender® - Style Guitars :
- It is suggested all work be preformed on a clean, padded, non-marring work surface.
- Remove strings, bridge and associated hardware.
- Check mounting hole sizes to verify they match holes sizes & depths per template instructions below. This is very important! If the sizes are not correct, you will damage or break mounting screws during installation.
- Place your new bridge into the guitar cavity, resting the bridge flat on the guitar top.
- Using a #2 Phillips head screwdriver, install the six (6) mounting screws so that the underside of the screw head is approximately 3/16” above the saddle surface of the bridge.
- Using the flat surfaces of the 2.5mm hex wrench (included) as feeler gage, adjust the six (6) mounting screws so that the hex wrench just fits between the underside of the screw head and the saddle surface.
- Double check this step so that all screws are adjusted exactly the same height. An incorrect adjustment could easily ruin your new bridge!
- This process should position the bridge with the suggested float of 1/16” above guitar body
- Place the face of guitar on a clean, padded, non-marring work surface.
- Install new claw (if necessary).
- Using a flat punch & hammer, gently tap in the return springs, so that they are firmly seated in the bridge block. Take precaution to support both the bridge & guitar before proceeding!
- Hook the other end of the springs into the claw.
- String up guitar, tune to pitch and test for smoothness and accuracy of return to “zero position”.
- Adjust claw in/out to obtain proper tension of bridge.
- Repeat any of the above steps as necessary.
- Adjust saddles for proper intonation & string height.
- DO NOT adjust the mounting screws with strings at full tension!!! Detune guitar!!!
Click here for Installation Tutorial Video
For Installation by Skilled & Authorized Technicians Only!
MannMade USA not responsible for damage caused by incorrect installationNew Installation: For custom or un-routed guitars :
- Route cavity to standard Fender Strat® vibrato cavity
- Refer to template instructions below.
- Install bridge per “Retrofit Instructions” above.
-
MannMade USA 2040 Tremolo Bridge for PRS Guitars
MannMade USA 2040 PRS/Mann Vibrato Bridge Mounting Instructions
Retrofit Installation: for direct installation on Paul Reed Smith® - Style Guitars :
- It is suggested all work be preformed on a clean, padded, non-marring work surface.
- Remove strings, bridge and associated hardware.
- Check mounting hole sizes to verify they match holes sizes & depths per template instructions below. This is very important! If the sizes are not correct, you will damage or break mounting screws during installation.
- Place your new bridge into the guitar cavity, resting the bridge flat on the guitar top.
- Using a #2 Phillips head screwdriver, install the six (6) mounting screws so that the underside of the screw head is approximately 3/16” above the saddle surface of the bridge.
- Using the flat surfaces of the 2.5mm hex wrench (included) as feeler gage, adjust the six (6) mounting screws so that the hex wrench just fits between the underside of the screw head and the saddle surface. Double check this step so that all screws are adjusted exactly the same height. An incorrect adjustment could easily ruin your new bridge!
- This process should position the bridge with the suggested float of 1/16” above guitar body
- Place the face of guitar on a clean, padded, non-marring work surface.
- Install new claw (if necessary).
- Using a flat punch & hammer, gently tap in the return springs, so that they are firmly seated in the bridge block. Take precaution to support both the bridge & guitar before proceeding!
- Hook the other end of the springs into the claw.
- String up guitar, tune to pitch and test for smoothness and accuracy of return to “zero position”.
- Adjust claw in/out to obtain proper tension of bridge.
- Repeat any of the above steps as necessary.
- Adjust saddles for proper intonation & string height.
- DO NOT adjust the mounting screws with strings at full tension!!! Detune guitar!!
Click here for Installation Tutorial Video
For Installation by Skilled & Authorized Technicians Only!
MannMade USA not responsible for damage caused by incorrect installationNew Installation: For custom or un-routed guitars :
- Route cavity to standard PRS Guitars vibrato cavity
- Refer to template instructions below.
- Install bridge per “Retrofit Instructions” above.
-
MannMade USA 2300 Intonatable Stoptail Bridge
MannMade USA
2300 Series Intonatable Stoptail Bridge Mounting Instructions
Includes models: 2300, 2310, 2315, 2316
Retrofit Installation: for direct installation on Stoptail bridge equipped guitars:
- It is suggested all work be performed on a clean, padded, non-marring work surface.
- Remove strings, bridge, studs and any associated hardware.
- Install provided studs to desired height.
- Install Intonatable Stoptail bridge on to studs.
- String up guitar, tune to pitch.
- Intonate saddles as necessary. (See notes below)
- Repeat any of the above steps as necessary.
- Adjust saddles for proper intonation & string height. (See notes below)
DO NOT adjust the Studs with strings at full tension!!! Detune guitar!!!
The Intonatable Stoptail Bridge comes packaged with either:
- PRS Core Guitars and Gibson USA Guitars use USA thread studs – 5/16-24 “
- PRS S2 / SE Guitars & Epiphone Guitars use Metric thread studs – M8 x 1.25
The Intonatable Stoptail Bridge comes assembled with pre-sized intonation springs.
- If you find that the saddles need additional forward travel, simply cut the intonation spring, as necessary.
- Assemble cut edge of spring against saddle.
The Intonatable Stoptail Bridge is available with pre-slotted saddles.
- Pre-slotted saddles are precision machined to optimum string height for most guitars.
- If you find that the saddles need lower action, simply slot the saddles deeper, using a 1/16” full radius nut/saddle file.
- We have the nut file available for purchase at our online store –
Unslotted saddles are sold separately-
Purchase MannMade USA 2300 Unslotted Saddles Here
The 2300 Intonatable Stoptail bridge can be cleaned and polished using any quality metal cleaner/polish designed for aluminum.
For Installation by Skilled & Authorized Technicians Only!
MannMade USA not responsible for damage caused by incorrect installation
-
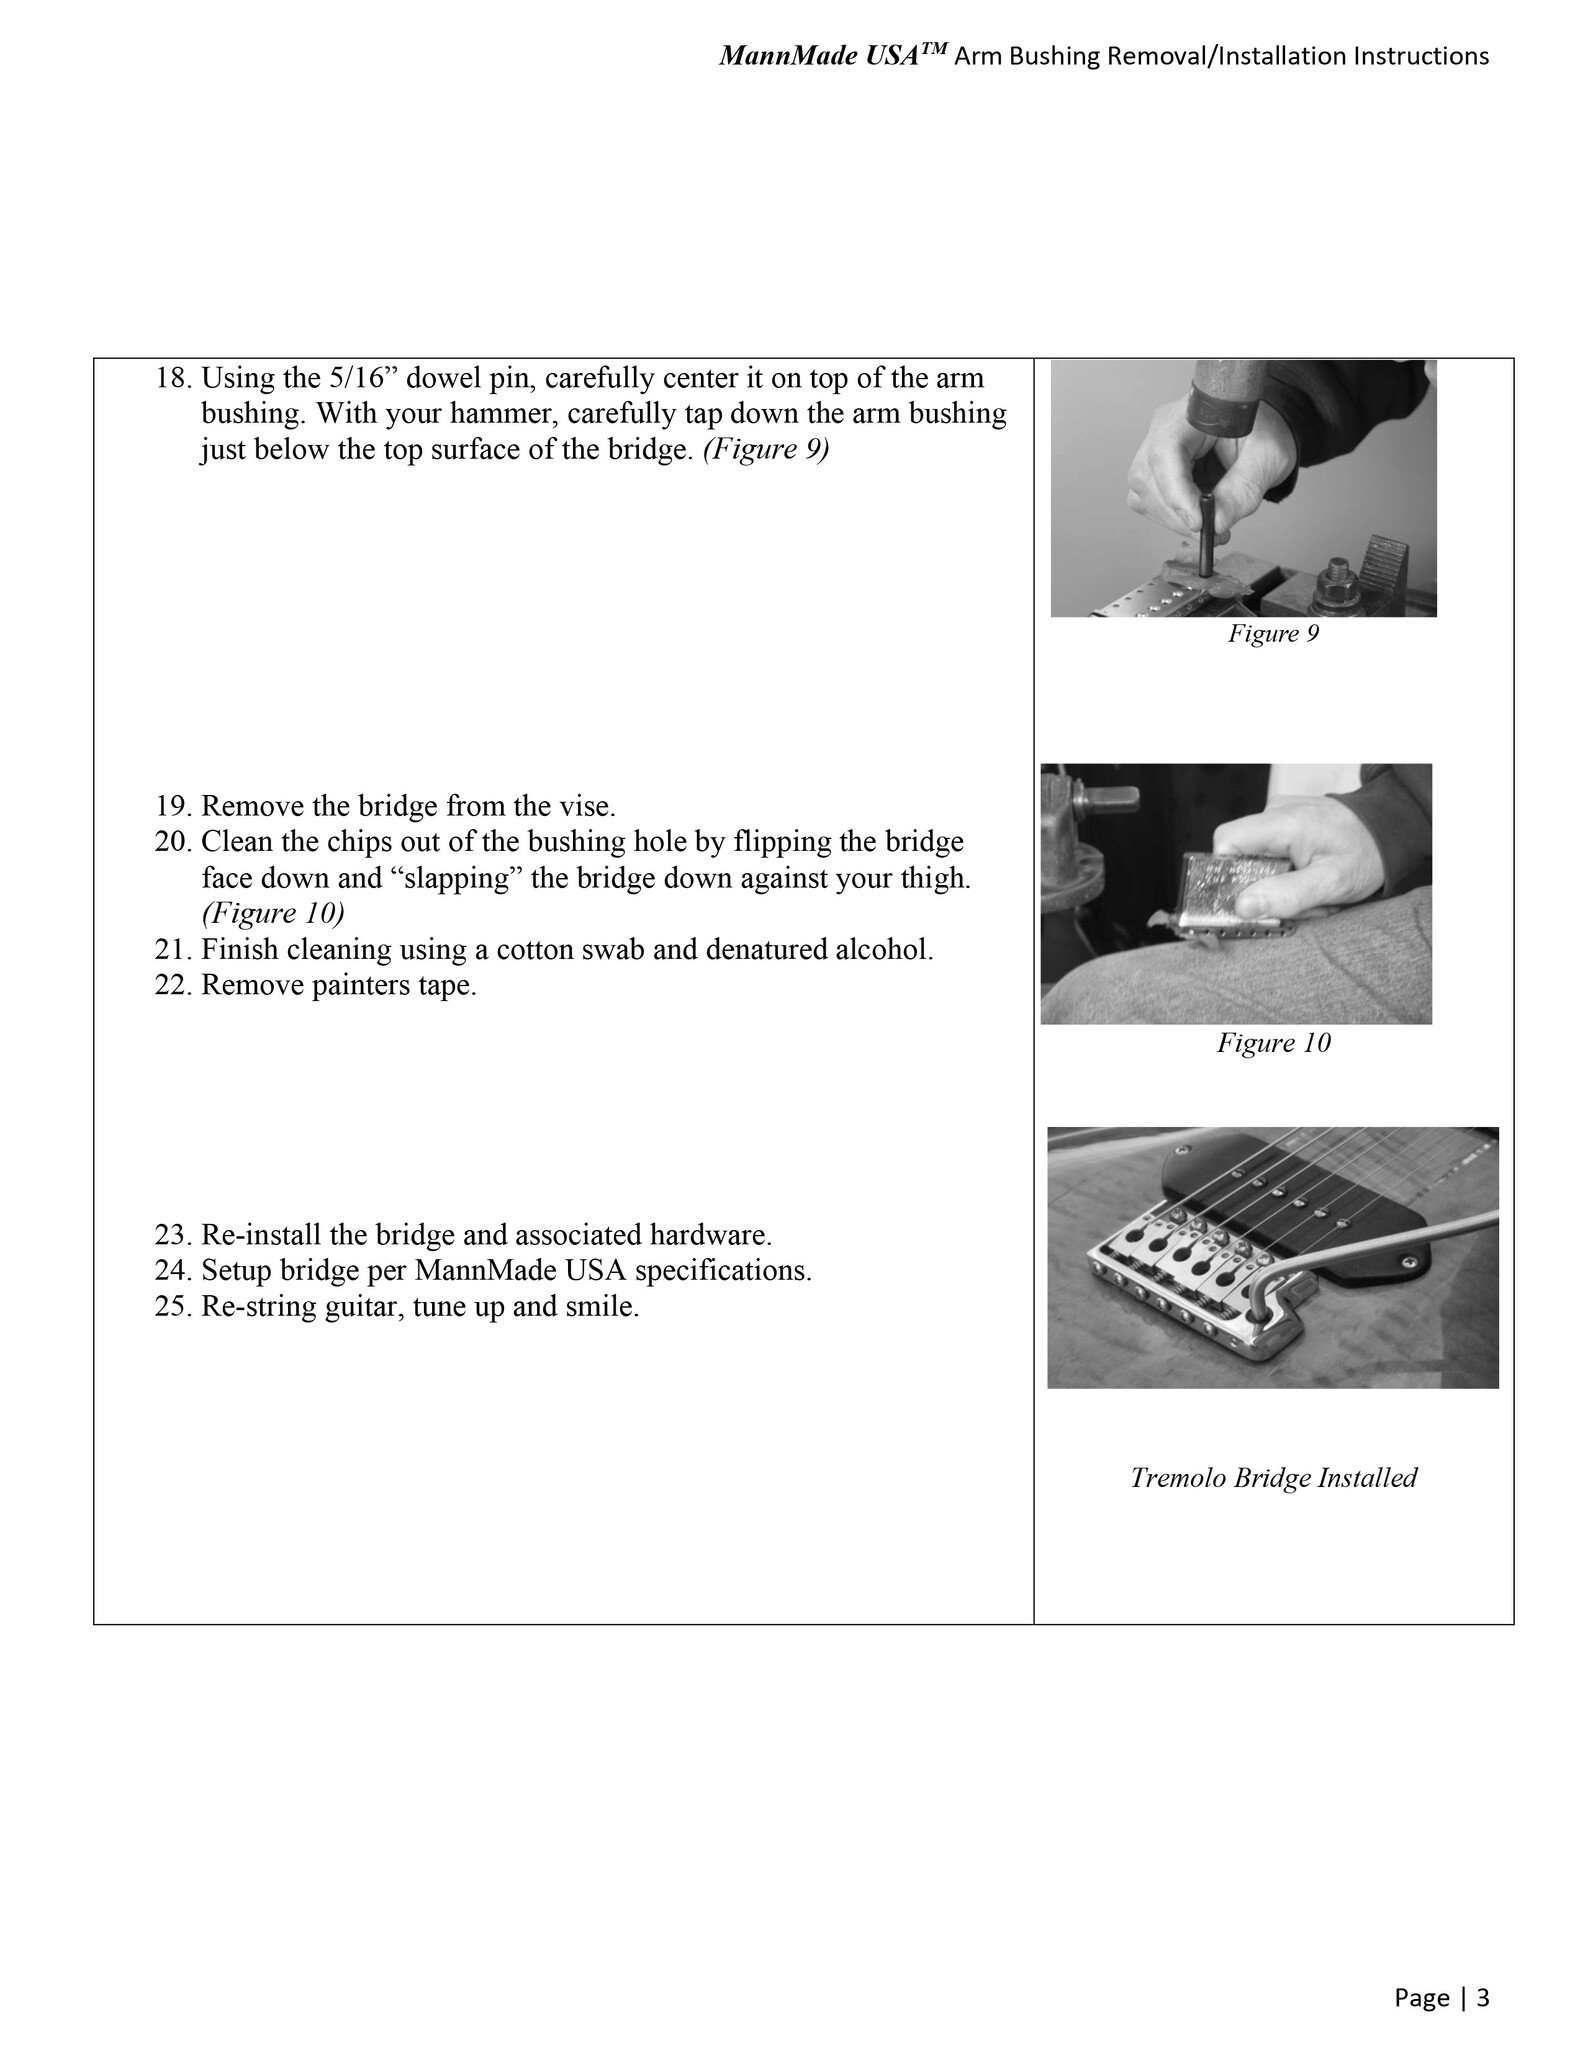
Tremolo Bridge Bushing - Removal & Installation
You can get in touch with our Customer Support by clicking the Help button at the bottom right of the page. You can also scroll to the bottom of any page on our website and click "Contact Us" under the Customer Service section.
If you run into issues using our Need Help widget, you can also email us directly at [email protected].
Please be sure to check your junk and spam folders for replies, as our messages can sometimes end up in these folders. You can also save our contact into your address book to ensure that our replies will be delivered to your inbox.
Phone support is available from 2pm – 6pm Eastern Time during our regular business hours. If you request a callback outside of these hours, we'll reach out to you as soon as we're back in the office.
(603) 488-1912
John Mann's Guitar Vault
112 Wallace Road
Bedford, NH 03110
Business Hours:
Monday-Friday
10am - 6pm EST